Installing Your AO Smith Expansion Tank Without Losing Your Cool
Why You Need an Expansion Tank for Your Water Heater
If you're looking for AO Smith expansion tank installation steps, here's a quick overview:
- Turn off water and power to the water heater
- Install a tee fitting on the cold water inlet line
- Check expansion tank pre-charge (should match home water pressure)
- Mount tank vertically at least 18" from water heater inlet
- Support tank with bracket (don't rely on piping alone)
- Turn on water supply and check for leaks
Water expands when heated - it's simple physics that can cause big problems in your home's plumbing system. When your water heater warms up cold water, that water needs somewhere to go. In closed plumbing systems (which most modern homes have), this expanding water can create dangerous pressure spikes up to 150 PSI or more - enough to damage pipes, fixtures, and even your water heater.
That's where an expansion tank comes in. AO Smith expansion tank installation provides a cushion for that expanding water, preventing pressure build-up and protecting your plumbing system from damage. Think of it as a safety valve that absorbs excess pressure so your pipes and water heater don't have to.
Without an expansion tank, you might notice your temperature and pressure relief valve (T&P valve) dripping, hear banging pipes, or experience fluctuating water pressure when using fixtures. These are all warning signs that your system is under stress.
I'm Mike Martinez, owner of Accountable Home Plumbing in Denver. With over 15 years of experience performing AO Smith expansion tank installation in hundreds of homes across the Denver metro area, I've seen how this simple addition can prevent costly damage and extend the life of your water heating system.

What You'll Learn
In this comprehensive guide, you'll learn everything you need to know about AO Smith expansion tank installation, including:
- The purpose of an expansion tank and how it protects your plumbing system
- When expansion tanks are required by code and why they're essential
- How to select the right size expansion tank for your water heater
- The tools and materials needed for a successful installation
- A detailed step-by-step installation process anyone can follow
- Proper maintenance tips to ensure your expansion tank works efficiently for years
By the end of this article, you'll have the knowledge to either tackle this project yourself or make an informed decision about hiring a professional.
AO Smith Expansion Tank Installation Requirements & When You Need One
Is your T&P (temperature and pressure) relief valve occasionally dripping water when nobody's using hot water? This isn't just a minor annoyance—it's actually your relief valve doing exactly what it's designed to do: releasing excess pressure that has nowhere else to go. And it's one of the clearest signs you need an AO Smith expansion tank installation.

So how can you tell if your home has a closed plumbing system that requires an expansion tank? There are several telltale indicators. You likely need an expansion tank if your home has a pressure reducing valve (PRV) installed, there's a backflow preventer or check valve at your water meter, or if you've recently added a water softener system. Many homeowners in Denver don't realize that local plumbing codes now require expansion tanks on all water heaters—it's not just a recommendation, it's the law.
When it comes to specifications, AO Smith doesn't mess around. Their expansion tanks are built tough, with ratings that can handle a maximum working pressure of 150 PSI and water temperatures up to 200°F. That's well beyond what your typical Denver home will experience, giving you a comfortable safety cushion.
For a proper AO Smith expansion tank installation, you'll need to follow these key requirements:
- Mount the tank at least 18 inches away from your water heater's cold water inlet fitting
- Install the tank vertically with the air valve pointing upward (this isn't just a suggestion—it ensures proper function)
- Properly support the tank with a bracket—I've seen too many DIY installations where the tank is just hanging from the pipes, which can lead to leaks down the road
- Ensure your home's water pressure sits at 60 PSI or below for best performance
Here's something many homeowners don't realize until it's too late: failing to install an expansion tank when required could actually void your water heater warranty. I've had to deliver this bad news to several customers in Westminster and Thornton who learned this the hard way when their warranty claims were denied.
Why Your Water Heater Needs an Expansion Tank
Let me explain why this matters with a simple fact: when water in a 50-gallon tank heats up from 55°F to 120°F, it expands by about half a gallon. That might not sound like much, but in a closed plumbing system, that extra volume has nowhere to go, causing pressure to spike dramatically.
Thermal expansion is inevitable —it's just physics. That modest-sounding half-gallon expansion can send your normal 50 PSI water pressure skyrocketing to over 150 PSI. For perspective, that's like taking the pressure in your car tires and tripling it!
Modern plumbing systems are closed loops by design. Since 1985, building codes have required backflow preventers to protect our municipal water supply from contamination. These devices create a one-way street—water can come in, but that expanded hot water can't flow back into the main supply line.
Your T&P valve isn't built for daily pressure relief. While it can release excess pressure, it's really an emergency safety device. Using it as your regular pressure relief system is like using your car's airbag to slow down instead of your brakes—it works, but it's not what it's designed for, and it won't last long.
Most importantly, these pressure spikes damage your entire plumbing system. I've seen it throughout Boulder and Broomfield—damaged pipe joints, leaking faucets, premature failure of dishwashers and washing machines, and water heaters that fail years before they should. One customer in Boulder had replaced three water heaters in five years before we identified thermal expansion as the culprit!
Sizing for AO Smith Expansion Tank Installation
Getting the right size expansion tank is crucial—too small won't handle the expanded water volume properly, while too large is just wasting your money and space.
AO Smith offers several expansion tank sizes, but the most common ones we install throughout Denver are:
- TW-5 Series: With a 2.1 gallon capacity, these are perfect for water heaters up to 52 gallons
- TW-12 Series: These larger 4.8 gallon tanks handle water heaters up to 100 gallons
Proper sizing depends on two main factors: your water heater's capacity(bigger heaters need bigger tanks) and your home's water pressure(higher pressure requires more expansion capacity).
Here's a straightforward sizing guide based on our experience installing expansion tanks throughout Denver, Longmont, and Arvada:
| Water Heater Size | Recommended AO Smith Model |
|---|---|
| Up to 52 gallons | TW-5-1 or TW-5-5 |
| 53-100 gallons | TW-12-1 or TW-12-5 |
| Over 100 gallons | Consult a professional |
The number after the dash in the model number indicates the warranty period (1 or 5 years). When in doubt about sizing, I always recommend going with the larger option—the small additional cost is worth the peace of mind, especially when you consider the cost of water damage or premature appliance replacement.
Choosing & Sizing the Right A.O. Smith Expansion Tank
For most homes, the TW Series is your go-to choice for residential water heaters. If you have specific needs, A.O. Smith also offers the ProMax PMC Series (designed specifically for drinking water systems) and the PMET Series (built for hydronic heating applications).
What makes these tanks special is their butyl rubber diaphragm—this isn't just a fancy feature, it's essential. This flexible barrier keeps the air and water chambers completely separate, preventing the air from dissolving into your water over time (which would render your tank useless). The stainless steel acceptance fitting is another thoughtful touch that helps prevent those frustrating leaks and corrosion issues we often see with lesser quality tanks.
When shopping for your expansion tank, always look for the ANSI/NSF 61 DHot certification. This isn't just another acronym—it's your assurance that the tank is safe for your drinking water. Thankfully, all A.O. Smith residential expansion tanks come with this important certification.
Here's a straightforward comparison of the models we most commonly install in homes throughout Westminster, Thornton, and the greater Denver area:
| Model | Tank Volume | Acceptance Volume | Connection Size | Max Pressure | Warranty | Water Heater Size |
|---|---|---|---|---|---|---|
| TW-5-1 | 2.1 gallons | 0.8 gallons | 3/4" NPT | 150 PSI | 1 year | Up to 52 gallons |
| TW-5-5 | 2.1 gallons | 0.8 gallons | 3/4" NPT | 150 PSI | 5 years | Up to 52 gallons |
| TW-12-1 | 4.8 gallons | 1.9 gallons | 3/4" NPT | 150 PSI | 1 year | Up to 100 gallons |
| TW-12-5 | 4.8 gallons | 1.9 gallons | 3/4" NPT | 150 PSI | 5 years | Up to 100 gallons |
| PMC-5 | 2.1 gallons | 0.8 gallons | 3/4" NPT | 100 PSI | 5 years | Up to 50 gallons |
For most Denver Metro homes we service, the TW-5-5 model hits the sweet spot—it offers perfect capacity for standard residential water heaters plus that extended 5-year warranty for extra peace of mind.
Understanding A.O. Smith Model Numbers and Specs
I'll let you in on a little secret—those A.O. Smith model numbers actually make sense once you know the code! It's like learning a mini-language:
The first part (TW, PMC, PMET) tells you which product line you're looking at. The number after the first dash roughly indicates the tank size in gallons. And that final number? That's your warranty period in years.
So when you see a TW-5-5, you're looking at a Thermal expansion tank from the TW series, about 5 gallons in size, with a solid 5-year warranty backing it up.
Now, let's talk about the two specs that really matter:
Tank Volume is pretty straightforward—it's the physical size of the tank. But the real MVP specification is the Acceptance Volume. This tells you how much expanded water the tank can actually handle, which is what you're really paying for.
For most homes in Arvada, Thornton, and Boulder with standard 40-50 gallon water heaters, you'll want an acceptance volume of at least 0.8 gallons. This gives you plenty of cushion for that expanding hot water.
One last thing to know— AO Smith expansion tanks come pre-charged from the factory at 38 PSI. But here's where many DIYers go wrong: you need to adjust this pressure to match your home's incoming water pressure for the tank to work properly. We'll walk you through how to do this in the installation section coming up.
Step-by-Step AO Smith Expansion Tank Installation Guide
Ready to install your expansion tank? Let's walk through the process together. While many homeowners can tackle this project themselves, we're always just a phone call away if you get stuck or prefer to have a professional handle it.
Tools & Materials for AO Smith Expansion Tank Installation
Before diving in, let's gather everything you'll need. Trust me, there's nothing worse than being halfway through a plumbing project and realizing you're missing something important!
For tools, you'll want two adjustable wrenches, a pipe cutter or hacksaw, a tire pressure gauge, and a manual bicycle pump or air compressor. Don't forget a pipe wrench, some Teflon tape (or pipe joint compound), and a simple leak detection solution—I just mix dish soap with water at home, works perfectly! A level will also come in handy.
As for materials, you'll need your properly-sized AO Smith expansion tank, a tee fitting that matches your existing pipe (usually 3/4"), and a short pipe nipple. I also recommend grabbing a dielectric union if you're connecting to copper piping, a mounting bracket for proper support, and a pressure gauge. If you don't already have one, pick up a shut-off valve as well.
Having everything ready beforehand will save you time and frustration. I can't tell you how many customers I've visited in Westminster who had to pause their DIY project halfway through because they forgot something simple!
Installation Steps: From Shut-Off to Final Leak Test
Let's break down the AO Smith expansion tank installation into manageable steps:
First, safety comes first. Turn off power to your water heater by flipping the appropriate breaker (or turning off the gas for gas heaters). Then shut off the cold water supply and open a hot water faucet somewhere in your home to relieve pressure in the system.
Next, connect a hose to the drain valve at the bottom of your water heater and drain about 5-10 gallons. This creates room for the expanded water that will flow back when you're finished.
Now for the expansion tank itself. Remove the protective cap from the air valve on top and check the current pressure with your tire gauge. Use your pump to adjust the pressure to match your home's incoming water pressure—typically between 40-60 PSI for most homes in the Denver area. Once set, replace the cap.
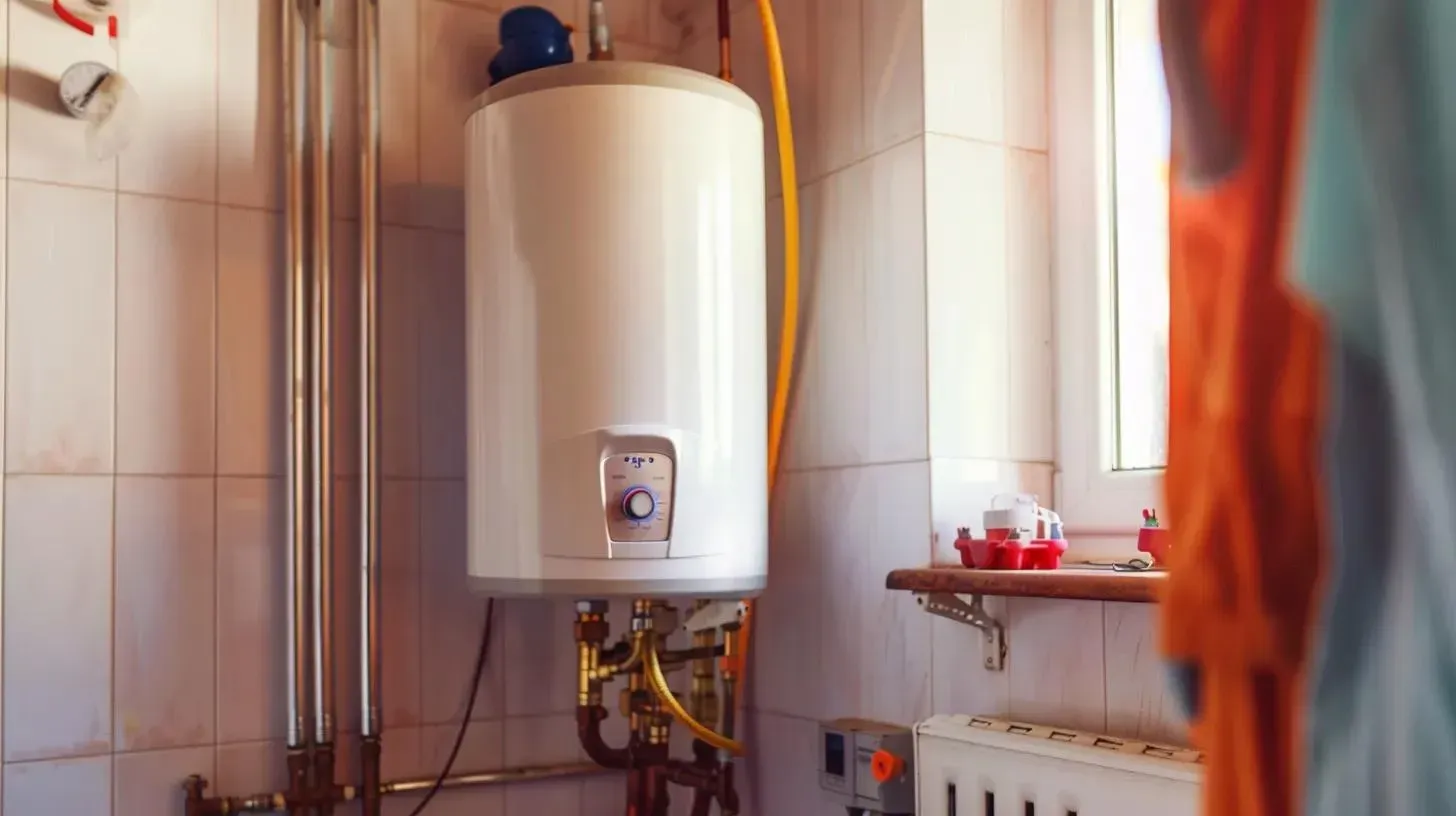
Time for the tee fitting installation. Locate the cold water inlet pipe (usually on the right when facing the heater) and cut it at least 18 inches away from where it enters the water heater. Install your tee fitting using the appropriate method for your pipes. For copper, most pros prefer using a dielectric union with sweat-soldering. With PEX or CPVC, use the appropriate connectors. If you're looking for a quicker option, push-fit "shark-bite" fittings work well without soldering.
Now let's mount that tank! Install a short pipe nipple into the tee fitting, apply Teflon tape or pipe compound to the threads of the expansion tank, and screw the tank onto the nipple. Make sure it's mounted vertically with the air valve on top. This is important—I've seen many installations in Broomfield homes where tanks were mounted horizontally, which significantly reduces their effectiveness. Always install a mounting bracket to support the weight; never let the plumbing alone bear the load.
After everything's connected, close the drain valve on your water heater and slowly open the cold water supply. Keep that hot water faucet open until water flows steadily, then close it. Grab your flashlight and leak detection solution to check all connections thoroughly. If you spot any leaks, fix them before moving forward.
Finally, once you're confident everything's watertight, restore power to your water heater. Let it complete a full heating cycle, then check the expansion tank and all connections again for leaks.
The whole process typically takes 1-2 hours, depending on your setup and experience. At Accountable Home Plumbing, we can usually complete an AO Smith expansion tank installation in about an hour for most homes throughout the Denver metro area.
Adjusting and Verifying the Air Charge
Getting the air charge right is absolutely critical to your expansion tank's performance. Think of it as setting the perfect air pressure in your car tires—too much or too little, and you're in for problems.
Start by measuring your home's water pressure using a water pressure gauge attached to an outdoor spigot or washing machine connection. For accuracy, check when no water is being used in the house.
Then adjust your expansion tank's pressure while it's not connected to the water system. If the pressure's too low, add air with your bicycle pump or compressor. If it's too high, release some by pressing the valve stem. AO Smith tanks come pre-charged at 38 PSI from the factory, but that's often too low for Colorado homes. We typically adjust to 60 PSI or to match your home's actual measured pressure.
Verify you've hit your target pressure with the tire gauge, and make a note to check this annually as part of your water heater maintenance routine. This simple step can extend the life of both your expansion tank and water heater significantly.
I remember helping a customer in Thornton whose expansion tank failed after just six months. The culprit? The pre-charge was set at the factory 38 PSI while their home water pressure was nearly 80 PSI! A quick adjustment would have prevented the premature failure.
Testing, Maintenance & Troubleshooting
Once your AO Smith expansion tank installation is complete, you'll want to keep it running smoothly for years to come. Don't worry—maintenance is pretty straightforward, and a little attention goes a long way.
Annual Inspection
Think of your expansion tank as needing an annual check-up, just like you'd get for your car. Here's what I recommend checking each year:
First, give your tank a good visual once-over. Look for any rust, corrosion, or little drips that might signal trouble. Sometimes the mounting bracket can loosen over time, so make sure everything's still firmly in place.
Next, do the "knock test." With your water heater off and pressure relieved (by opening a faucet after shutting off the water), give your tank a gentle knock with your knuckles. The top half should sound hollow (that's the air pocket), while the bottom half should sound solid (that's the water). If the whole thing sounds solid like a drum, your bladder might have failed.

Don't forget to check that pre-charge pressure too. It should match your home's water pressure, and it can drift over time. This five-minute check can prevent bigger headaches down the road.
Common Problems & Quick Fixes
In my years serving homes across Boulder, Longmont, and Denver, I've seen a handful of common issues pop up with expansion tanks. Let me share some wisdom:
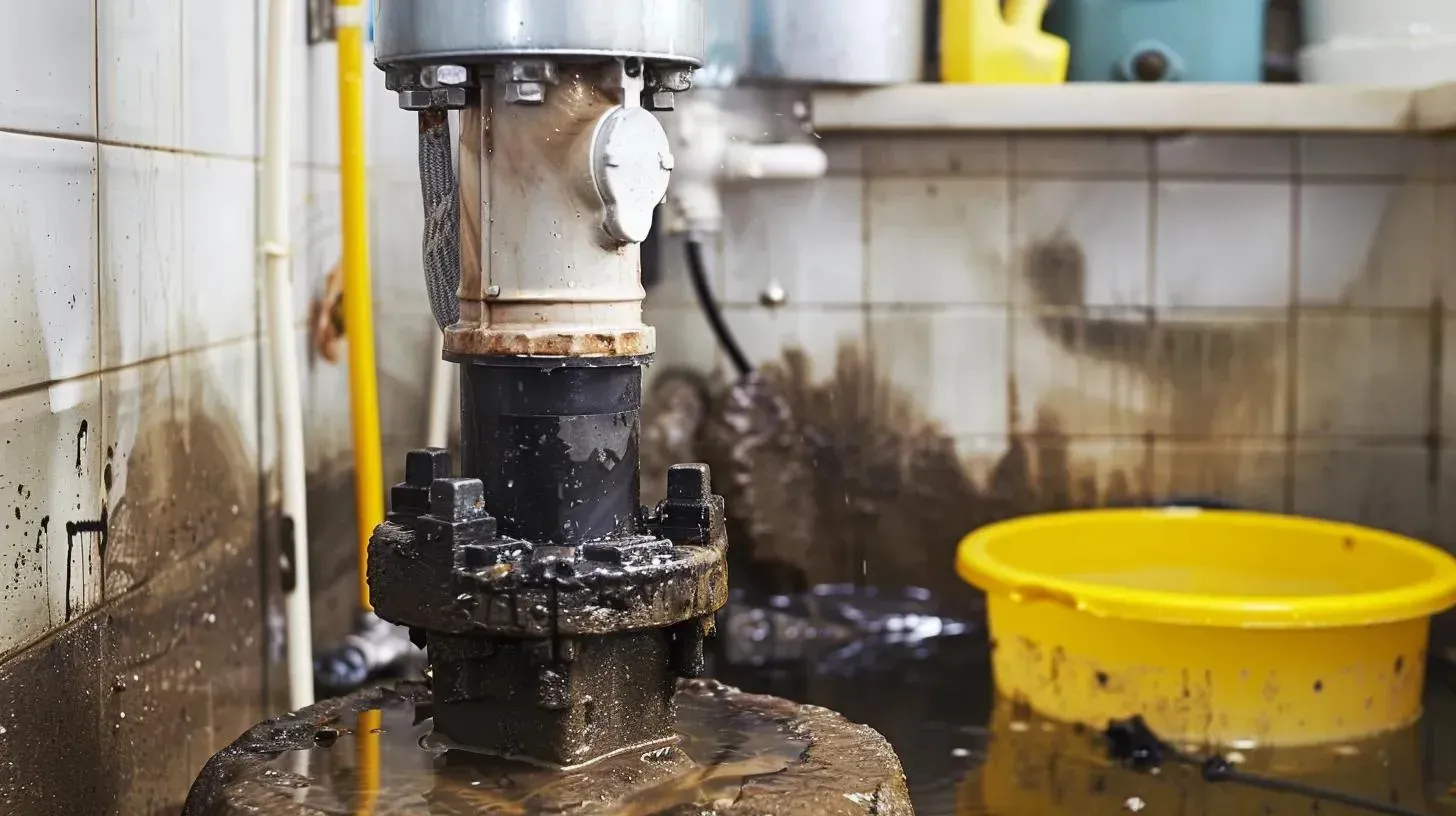
Waterlogged tanks are probably the most frequent problem. If your tank feels surprisingly heavy or sounds solid all the way through when tapped, the internal bladder has likely failed. Unfortunately, there's no fixing this one—replacement is your only option. The good news? Installing a new one is straightforward if you've done it before.
Incorrect pre-charge is another common issue. If your T&P valve starts dripping again during heating cycles, your tank's air pressure probably doesn't match your home's water pressure. Simply adjust it using the steps we covered earlier, and you should be good to go.
Seeing water dripping from connections? That's typically just a matter of tightening things up or adding a bit more thread sealant. Catch these early before they become bigger problems.
If you installed your tank horizontally or at an angle(despite what the instructions said), you might notice it's not working as well as it should. These tanks are designed to work vertically with the air valve on top—any other position reduces effectiveness and can lead to early failure.

Still experiencing pressure spikes even with your expansion tank installed? You might have an undersized tank for your system. Water heaters larger than 50 gallons typically need the larger TW-12 series rather than the TW-5. Sometimes homes with particularly high water pressure need additional solutions beyond just the expansion tank.
At Accountable Home Plumbing, we include expansion tank checks with our Routine Water Heater Maintenance services throughout the Denver Metro area. If you're not comfortable doing these checks yourself, we're happy to help.
Warranty & Code Compliance Essentials
AO Smith stands behind their products with solid warranty coverage, but the length depends on which model you choose:
The TW-5-1 and TW-12-1 models come with a one-year limited warranty, while the TW-5-5 and TW-12-5 offer more peace of mind with five-year coverage. The difference in price is usually minimal, so I typically recommend the longer warranty for most homeowners.
To keep that warranty valid, make sure you follow all the guidelines in the 332845-000 TW Series Manual. This includes proper mounting (vertical position, properly supported) and installation according to local codes.
Speaking of codes, most areas around Denver now require expansion tanks on all new water heater installations. Some municipalities may even require a permit and inspection for water heater replacements, which would include checking your expansion tank installation. The requirements can vary between Westminster, Thornton, Broomfield, and other areas, so it's worth checking with your local building department if you're doing this yourself.
If you ever need help understanding the requirements or have questions about your AO Smith expansion tank installation, you can check AO Smith's Thermal Expansion Tank Help resource or give us a call. We're always happy to help keep your water heater running safely and efficiently.
Frequently Asked Questions about AO Smith Expansion Tank Installation
Do I always need an expansion tank with my water heater?
This is probably the most common question we hear from homeowners across Denver, and the answer isn't a simple yes or no.
You definitely need an expansion tank if your home has what plumbers call a "closed system." This includes homes with backflow preventers, check valves, or pressure reducing valves (PRVs) installed on the main water line. Most newer homes and recently remodeled properties have these devices.
Local building codes throughout Colorado increasingly require expansion tanks. In fact, during our service calls in Westminster, Broomfield, and Thornton, we've noticed that most municipalities now mandate them for all new installations and replacements.
If you're experiencing symptoms like a dripping temperature and pressure relief valve or mysterious banging pipes when no one's using water, these are telltale signs you need an AO Smith expansion tank installation.
Even when not strictly required, I always recommend installing one as preventive maintenance. Think of it this way: spending $150-$450 now on an expansion tank is much cheaper than replacing damaged pipes, fixtures, or your entire water heater later. It's simple insurance for your plumbing system.
How do I know if my existing expansion tank has failed?
After installing hundreds of replacement expansion tanks throughout Boulder, Longmont, and the Denver area, I've seen all the classic signs of failure. Here's what to watch for:
Your T&P valve starts dripping during heating cycles again – this is your first clue something's wrong. When you touch the tank, it feels unusually heavy or waterlogged. If you press the air valve (like you would on a bicycle tire) and no air comes out, that's a bad sign.
A simple test we use at Accountable Home Plumbing is the "knock test." Tap on the tank with your knuckles – a properly functioning tank should sound hollow in the top portion (where the air is) and solid in the bottom (where water contacts the bladder). If it sounds solid throughout, the internal bladder has likely failed.
Another dead giveaway is when water suddenly gushes from fixtures when first opened, as if the system is over-pressurized (because it is!).
We include expansion tank checks as part of our standard water heater maintenance service. It only takes a few minutes but can save you from bigger headaches down the road.
Can I install the expansion tank horizontally if space is tight?
No. I can't emphasize this enough. Despite what you might see in some DIY videos online, AO Smith expansion tank installation must be done vertically with the air valve pointing upward. This isn't just a recommendation – it's a requirement.
Horizontal installation causes the water to press against the bladder unevenly, which leads to premature failure. Even worse, installing horizontally will likely void your warranty when problems arise.
I understand space constraints can be challenging. In many older homes throughout Arvada, Northglenn, and Thornton, water heaters are tucked into tight closets or crawlspaces. But there are better solutions than improper installation:
We can often install the tank on a nearby wall with longer connecting pipes. Sometimes we need to relocate other items to make room for proper vertical installation. In extremely tight spaces, we might recommend alternative piping configurations that maintain the vertical orientation.
At Accountable Home Plumbing, we've successfully installed expansion tanks in some remarkably cramped spaces while still keeping them vertical. It might take a bit more creativity and time, but doing it right the first time prevents headaches later.
Conclusion
Installing an AO Smith expansion tank isn't just a good idea—it's essential protection for your entire home plumbing system. Think of it as an insurance policy that costs a fraction of what you'd pay to repair water damage or replace a failed water heater.
Throughout my years serving homeowners across Denver, I've seen how these simple devices prevent thousands in potential damage. When properly installed, an expansion tank creates a pressure safety zone that extends the life of everything from your water heater to your faucets and appliances.
For the DIY-minded homeowner with basic plumbing skills, installing an expansion tank is certainly doable in an afternoon. But if you're unsure about any step—from selecting the right size to setting the proper pre-charge—we're always here to help. At Accountable Home Plumbing, we can typically complete an AO Smith expansion tank installation in a single visit with no surprises in pricing.
As you consider your next steps, keep these crucial points in mind:
Your expansion tank is a must-have if you have a closed plumbing system (which most modern homes do). The tank needs to be installed vertically, with proper support, and at least 18 inches from your water heater's cold water inlet. And remember—the pre-charge pressure must match your home's water pressure for the tank to work correctly.
Don't forget that yearly maintenance check! Just a few minutes once a year to verify the tank's pressure and condition can prevent bigger headaches down the road. When we perform routine water heater maintenance for our customers in Westminster, Thornton, and throughout the Denver area, we always include expansion tank inspection as part of our service.
The peace of mind that comes from knowing your plumbing system is protected from thermal expansion is invaluable. Your water heater will thank you with years of reliable service, and you'll avoid those middle-of-the-night emergencies that always seem to happen at the worst possible time.
If you're in Broomfield, Westminster, Thornton, Northglenn, Arvada, Boulder, Denver, or Longmont and need help with your AO Smith expansion tank installation, we're just a phone call away. Our team at Accountable Home Plumbing is ready to ensure your water heating system is safe, efficient, and built to last.